Fine 1 - Tablebase ½
Let's go back to Chess and Impressionism (September 2018), where I wrote,
After my first idea for today's post ran into trouble when I ran out of time (a follow-up to last week's 'A Remarkable Tool', if you're curious) [...] I'll try to return to 'A Remarkable Tool' in another post.
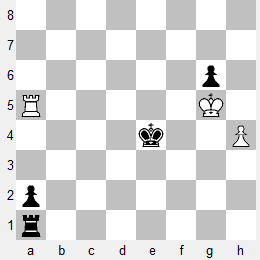
In the post A Remarkable Tool, I aimed Lichess's seven piece tablebase at an endgame of the type R+2P vs. R+P. After documenting some flawed analysis, I then tackled the same class of endgame in Reuben Fine's 'Basic Chess Endings' (BCE). Fine's analysis was 100% accurate on every position I looked at until I 'ran out of time'. Continuing with Fine during the next session, I discovered the following position. (Use the link under the diagram to follow the analysis on Lichess.)
BCE no.363

Lichess: 8/8/6p1/R5K1/4k2P/8/p7/r7 w - - 0 1
Fine wrote,
To blockade the Pawn with the [defending] Rook is less favorable. It is relatively best to have the Rook behind the Pawn. In that event, the defender draws if his King can find a haven behind the Pawns, but loses if he cannot. As a rule the King can find a safe spot only if the two remaining Pawns are on the same file.
No.363 (Steinitz - Gunsberg, 9th match game, 1890-91) is typical. Against the threat of the removal of the Black Rook with check White is defenseless, for on 1.Kh6 g5! compels him to expose his King.
Fine's logic looks straightforward, but there is a neat twist hidden in the position. After 2.Ra4+ (the only move) 2...Kd5 3.Ra5+ (ditto) 3...Kc6, the move 4.hxg5 is an error. White should sacrifice a second Pawn with 4.Ra3 (4.Ra8 leads to the same idea), entering a Rook endgame two Pawns down, where the extra Pawns are a- & h-Pawns. This is known to be drawish.
Indeed, after 4...gxh4, White has a series of forced moves that lead to a draw: 5.Rc3+ Kd5 6.Rc2 Ke4 7.Kh5 Kf3. Now follows, for example, 8.Rb2 h3 9.Kh4 (forced) 9...h2 10.Rxh2. Black can try other attacks, but White always has a counterattack. After rejecting 1.Kh6, Fine continued,
Consequently the only hope lies in driving the Black King as far away from the K-side as possible, giving up the Rook for the RP, and taking one's chances on the ensuing R vs. P ending. This stratagem is bound to be unsuccessful here because the Black King is too near.
He gave 1.Ra4+ Kd5 2.Ra5+ Kc6 3.Ra6+, and Black wins. He again overlooked 3.Kh6, which after 3...g5, reaches the same position as in the line after 1.Kh6.
None of this is meant to belittle Fine. BCE was a landmark chess book and much of the analysis has withstood the test of time. This post is meant instead to demonstrate the kind of subtleties that are available in the common R+2P vs. R+P endgames.


No comments:
Post a Comment